Special Aircraft Service

Please login or register.

Login with username, password and session length
Advanced search  
Pages: 1 ... 27 28 29 [30] 31 32   Go Down

Author Topic: Thorneycroft Amazon WF/AC6/1/Coles Mk VII, series 2.  (Read 53671 times)

0 Members and 1 Guest are viewing this topic.

Mission_bug

  • Modder
  • member
  • Offline Offline
  • Posts: 5977
Re: Thorneycroft Amazon WF/AC6/1/Coles Mk VII, series 2.
« Reply #348 on: August 21, 2021, 04:38:57 AM »

Hello Shessi, glad you like my attempt at destroying the vehicle I spent nearly two years building. 8)

That will be the last update now for a while, I decided to do the Lods now before I start on anything else
that way I should at least complete it, three Lods should do I hope but it will take some time to do each
mesh especially as some are different when you get to the raised crane boom and the damaged vehicle. ;)

It will be more tedious than difficult as I will just be removing items but it all takes time, maybe not entirely
necessary with our modern machines but I will for completeness, there will also need to be some texture
changes to allow for the Lods.  :o

This work will also give me a chance to replace the shadows as from what was written recently rather than just
copy the existing mesh it is better to use something like the Lod3, something else to experiment with. :D


Take care and be safe.


Wishing you all the very best, Pete. ;D
Logged

Mission_bug

  • Modder
  • member
  • Offline Offline
  • Posts: 5977
Re: Thorneycroft Amazon WF/AC6/1/Coles Mk VII, series 2.
« Reply #349 on: August 28, 2021, 05:20:15 AM »

Hello again guys, just another brief update. ;)


I have started the lods doing the dead model first, it has less parts and has already had the polygons reduced
somewhat, this can work against you because some of the parts are sparse and it becomes difficult to keep
any kind of detail the further you go, however, I was forced to do this to the dead model to have it show up. :(


So, here we go, the chassis first up because this is the base of the vehicle you could say, it attaches to the map
and the parts to it, here is LOD1 2 and 3, my first problem here was I had removed the axles and I wanted to use
LOD1 as the shadow for the LOD0, I did eventually clone another part and add some axles to make up for this:


The IL_2 Bible indicates each LOD should be half of the previous or there about and I decided on three for this vehicle,
shadows I could not find any actual figures so as Mentioned earlier I will use LOD1 to replace the current LOD0 version
and then LOD3 for LOD1,2 and 3, not sure that is exactly how to do it but that is how I will go, if anyone can provide
better information please post.

How to do the reduction?  Well, in gmax there is a tool called the Optimizer that can help but its actual use is minimal, I tried
various settings but in the end went for a me, myself and I approach and did it manually a bit at a time, it is tiresome. ::(

Here we see I am joining some of the more shapely elements of the part together to reduce things as best I can, I find it
helps with the early work if you have some higher poly shapes but here I was limited as I already mentioned but even so
found enough to play about with:


Here a closer look, by simplifying these edges you manage to reduce things by taking this approach to each part:


The above finally broke down into the various LODs needed:


A look in game after some of the work is done shows that the shadows and LODs do appear to be working
by zooming in and out but I do not know if there is a particular way this is meant to be tested, some of the
shadows are missing some detail but again as mentioned the IL_2 Bible is a little sparse on just how much
each LOD shadow should be other than mentioning something about LOD3:


I have seen those with 3ds Max can actually extract all their parts together with the LODs, sadly I am
not that far advanced enough with gmax tinkering to know how or if it can be done with the program I
have. :D

Everything I do is added singly and slowly step by step and I assembly the three Lods and add the
necessary text as I go using some pre-prepared files that allow me to copy and paste what I need into
each mesh before taking each individually into the main mesh, here you see the workbench:


Here you see my slow process in use as I take each mesh in turn and add its particular text as methodically
as I am capable of trying not to miss anything as I go:


A check of the finished mesh by opening it up in MshConverter, all seems okay, the bits I hoped would show
have so looking good for a test in game:


Final task is to add the Lod distances, these come from a building model I did that used figures from a game
item, I do not know how we decide on the figures or ultimately test them as such so as long as it all shows
in game I have to consider it close enough:


I made a set of textures using Hi, Mid and Lo as I had in a previous fire engine project and assigned them each
a Mat file, it will get quite cluttered once I move on to the main model as that has many more parts but for the
dead version at least it appears to work as hoped:


The moving vehicle and its static fellows will essentially follow the above procedure but have far more components
and many more polygons to remove but I thought those of you who have continued to look in might find some of
this useful, the experts maybe not, I have much to learn and I am sure this whole process can be done much more
quickly with the right knowledge but for now it does appear to be working at least. ;)


Take care and be safe.

Wishing you all the very best, Pete. ;D
Logged

Mission_bug

  • Modder
  • member
  • Offline Offline
  • Posts: 5977
Re: Thorneycroft Amazon WF/AC6/1/Coles Mk VII, series 2.
« Reply #350 on: September 19, 2021, 04:59:03 AM »

Hello again guys, not much to report but I thought you might like to see where I am at with it. ;)


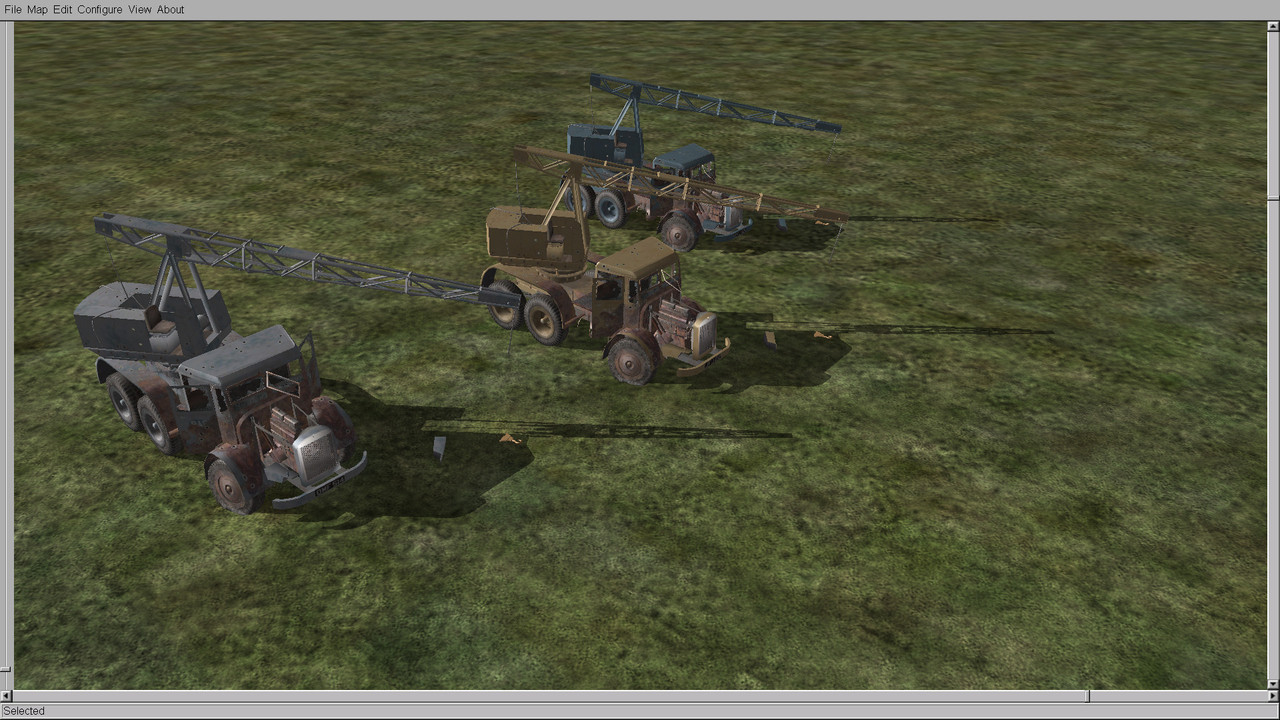
The Lods for the dead model are done and installed, I do not know of any specific way to test these
to show you they are actually working other than disable one at a time but that seems a lot of messing
really so here you can see each version does show in game, I only worry when nothing shows:


Before I did anything further with meshes I went through the same process as for the dead model making
the three different sized textures for each lod:


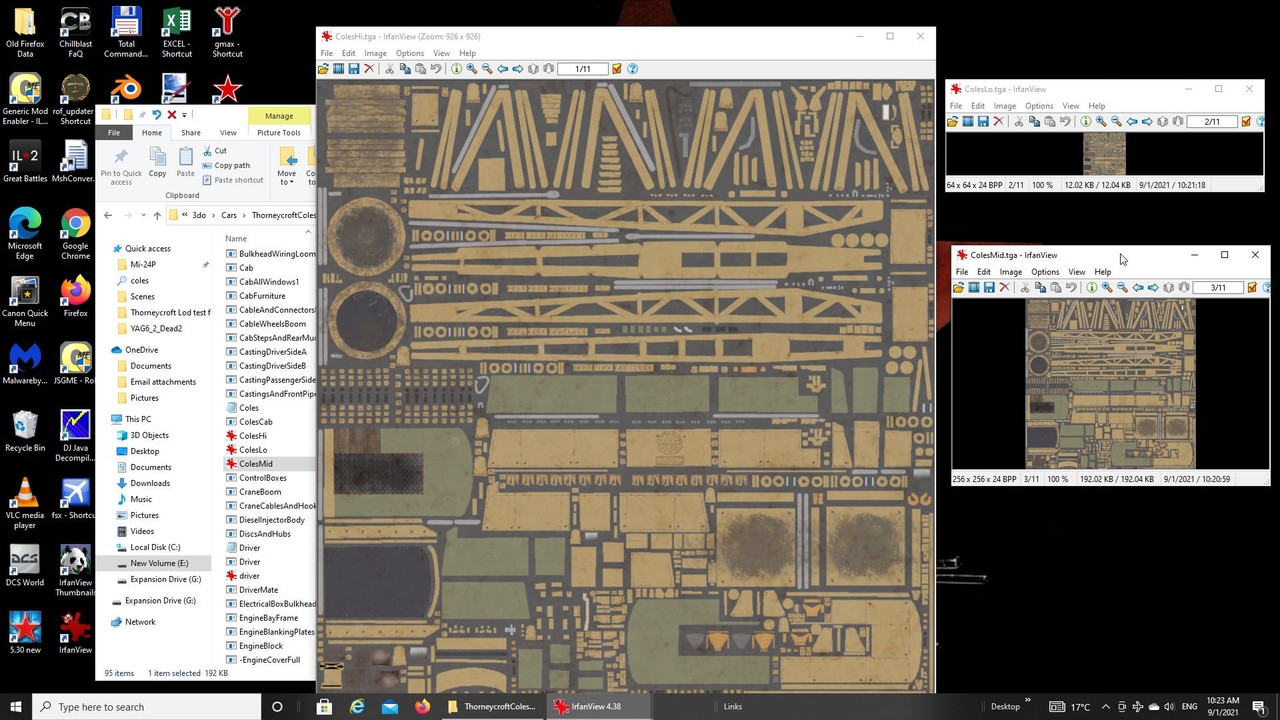
All the mat files were also assembled and then these were posted into all the other folders moving or static
because all would use them eventually and the existing meshes were renamed accordingly:


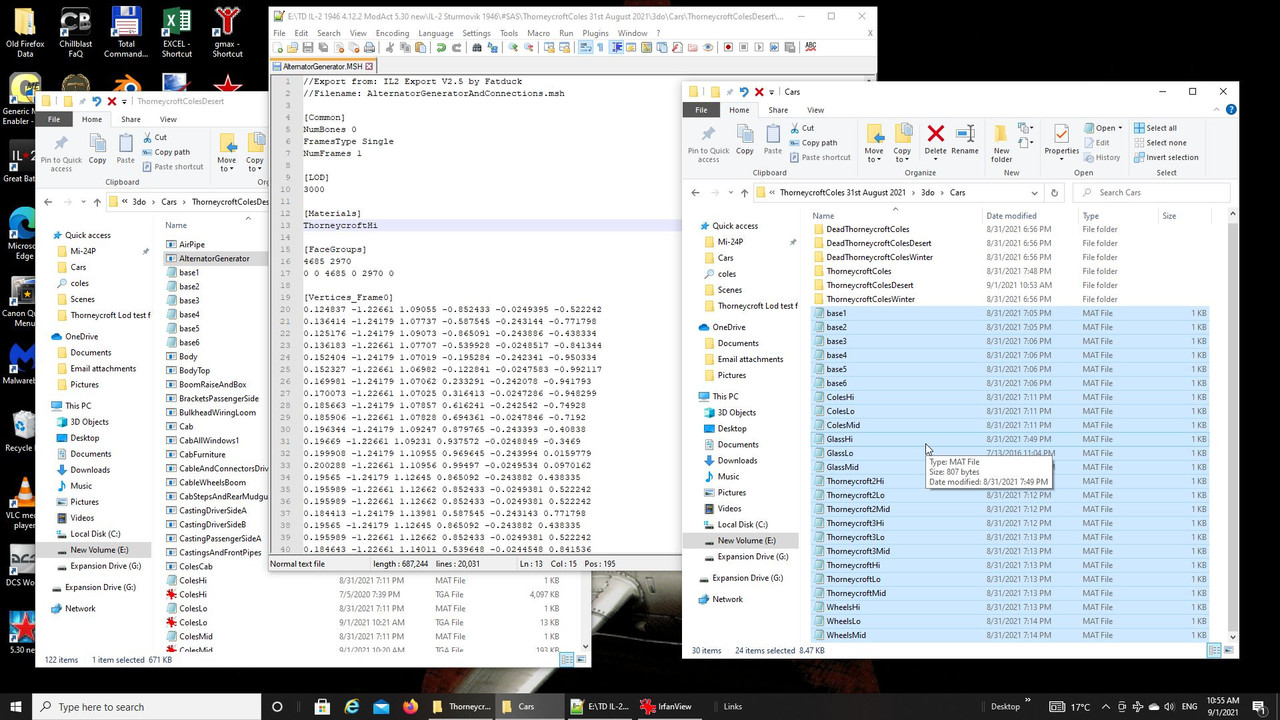
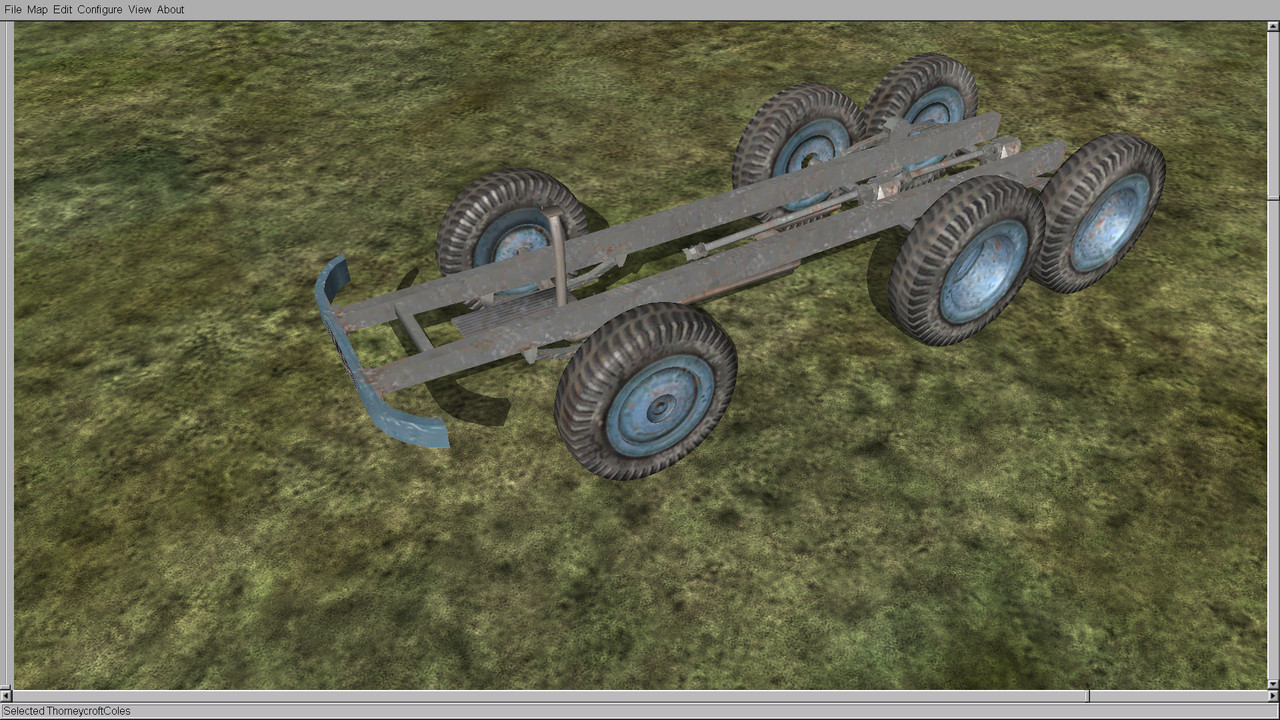
When I moved on to the meshes I started with the wheels because I already had the rear ones done from the
damage model, it was just a case of slightly altering their position as they were slightly angled for the damage
version, the poly reduction then moved to doing new lods for the front wheels, the chassis has no lods here but
they were added later, I needed it to hang everything on:


The remaining meshes I would do in the order I found then in the folder just going down through them
doing the next in turn as they had been sorted alphabetically in there as apposed to how I had originally
added them in the hier, new entries would be added to the new heir as I added each part before the poly
reduction was started.

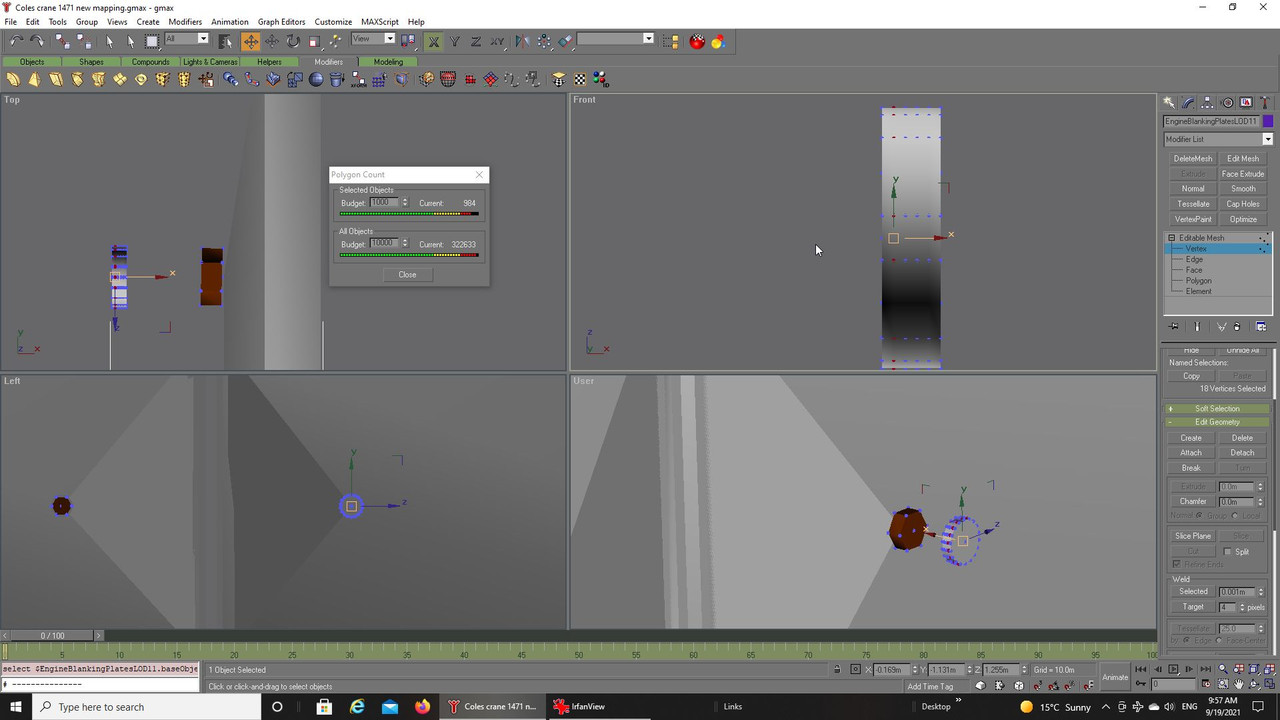
Now for the main reason to post today besides just boring you all with the progress on this lovely sunny Sunday. :D

I usually start the poly reduction by removing things such as what represents washers and bolt threads as anything
round tends to have the highest poly count and can be a good way to reduce the first lod quickly if it contains such
items.   This I did when doing the blanking plate, however, it seemed to reduce the poly count by a inordinate amount with
each deletion of the washers. :o

I checked that ignore backfacing was on, not that it always works as it should, and I was not deleting anything else.  Selecting
one of the washers gave me the reason, to many vertices:


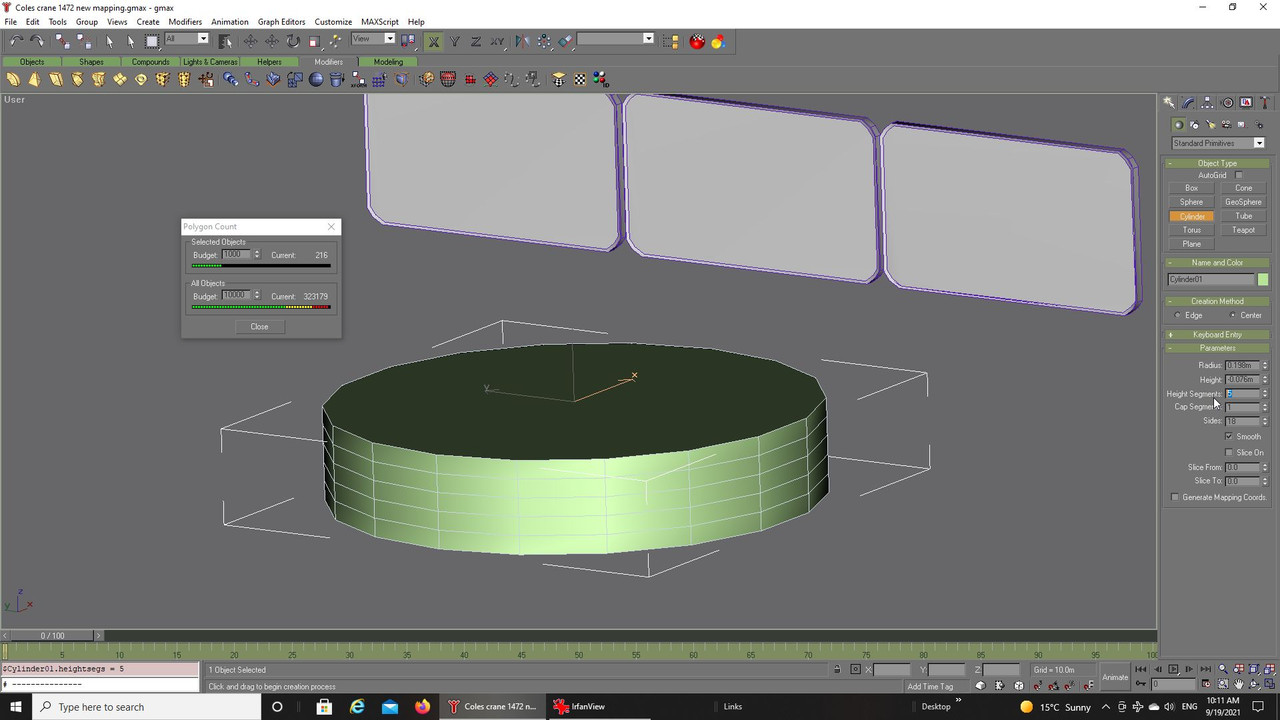
I decided to leave as is on this occasion as I was so far into the project but thought I would point out the
the issue and how it comes about.  When we make anything round we are given a choice as to just how
smooth or otherwise the diameter is and also how many height segments we use, the height segments can
be a good way of altering the shape along the length of a bar, enlarging or reducing it, however, for things
like plain washers it just adds far too many polygons than are needed and in this instance I had forgot to
reduce the amount in the height segment box and once I cloned each washer it just increased this poly count
as I added one after the other along the blanking plates:


It is very easy to forget and there are other instances such as when using the line tool that we can be caught out,
I am sure I have mentioned it before but it does no harm to remind myself and you guys that it can be a real problem
if not dealt with at the right time.  There is a simple enough way to change this if as in my case I forgot and essentially
involves taking one set of vertices and moving them close to the next before joining them together, then move along to the
next, you need to reset the welding distance, something I have shown before, eventually they can be reduced so you
just have the front and back vertices.

So, here is the model so far, it contains around seventy parts I have made and two separate driver meshes and as
I write this I have so far added lods to 30 of them so still a long way to go:


Most of the parts once done can then be used as is in the other folders, however, the Coles Crane folder contains
some meshes I altered especially to enable a raised position for the static models in some of the folders so that will
add a few more to the total.

Before I started the lod build I saved a folder of the original vehicle with all the parts in it for the moving Thorneycroft
and then made a new one just containing the textures, mat files and hier, once I finish a part, in this case the blanking
plate I then add the next in order into the folder to start the latest addition and delete the meshes I just finished using,
this keeps me moving onward in some kind of structured way so I do not forget anything:


Once that is done I open up gmax and find that next mesh in the order and clone it to form the LOD1, hiding
the original then saves you reducing the the wrong mesh, and go through the process all over again for each
lod, it is very tiresome, no wonder new models take so long to make:


With each addition I make a copy of the folder and save it to my external drive along with the necessary scenes
from gmax, bitter experience has shown how easy it is to lose hours of work so it is yet another routine I try to
stick to following every session no matter how long or short.


So far I have been trying to do a couple of meshes a day if and when my health condition allows so it is moving
along but with still 40 parts just for this vehicle to do it will not be quick. :P


Take care and be safe.

Wishing you all the very best, Pete. ;D
Logged

rogeroger

  • Missioneer
  • member
  • Offline Offline
  • Posts: 470
Re: Thorneycroft Amazon WF/AC6/1/Coles Mk VII, series 2.
« Reply #351 on: September 19, 2021, 08:02:42 AM »

The lods are hard work when the main model is already finished. :) Those models look great with cranes intact.
Logged

Mission_bug

  • Modder
  • member
  • Offline Offline
  • Posts: 5977
Re: Thorneycroft Amazon WF/AC6/1/Coles Mk VII, series 2.
« Reply #352 on: September 19, 2021, 12:30:08 PM »

The lods are hard work when the main model is already finished. :) Those models look great with cranes intact.

Glad you like the overall build Glen.  8) 

Much of the detail gets lost in the overall thing and there is more than needs be really but I enjoyed the work even if I had to
take so long doing it, lods are certainly more of a chore to do now though but finish I will.

Originally the intent was just to find something to build, it was not intended for IL-2 as such, it was only once I started to add
things into game that I decide I should do the lods as well for completeness sake. :o

Thing is the vehicle would only show up as a single entity if at all in game so even older machines should be able to cope with it
on its own without lods, not like there will be thirty or so in formation at one time, however, I gave up doing the other modding
stuff to more concentrate on building 3d models so I though it better to do this complete if I could.  With so many parts in the
build I had a feeling I could get bogged down if I did lods at the same time so felt it better to at least build the truck and crane
complete rather than risk giving up part way through if I got fed up with how long it was taking.  :D

I have to be honest I am surprised I managed to get the build this far, with illness and other things I have waned at times and
been on the verge of giving in and was not sure if or when I would finish it, at least the vehicle is done as such this extra stuff
is just icing on the cake so say. ;)

Take care and be safe.

Wishing you all the very best, Pete. ;D
Logged

stanislao

  • Modder
  • member
  • Offline Offline
  • Posts: 1519
Re: Thorneycroft Amazon WF/AC6/1/Coles Mk VII, series 2.
« Reply #353 on: September 20, 2021, 05:18:14 AM »

 ;D   Good boy ! You have done a truly fantastic work! At the beginning I did not understand the reason for so much dedication and determination for an object that after all can only be appreciated by the few who love perfection and realism in airport scenarios, then I understood your motivations and believe me I am very grateful to you for this creation that is and will become an example for all those who want to take the path of modding!
Thanks again Pete.

Logged

Mission_bug

  • Modder
  • member
  • Offline Offline
  • Posts: 5977
Re: Thorneycroft Amazon WF/AC6/1/Coles Mk VII, series 2.
« Reply #354 on: September 20, 2021, 08:59:37 AM »

Glad you like the work so far stanislao. 8)

I have always liked objects in missions that give life to the airfield, most of the vehicles I remember as models from the Airfix company are
available to us from various sources either made specific for IL-2 or imported, the Thorneycroft was missing and seemed to offer a very
interesting subject so I made it, took much longer than the model kits but worth the effort I think. ;)

The vehicle is actually in many WWII photographs and seemed to be more prolific than I imagined, the recovery tractor and trailer not much
so, you now have the ability to add it in where it might fill a space in a mission/campaign diorama and add that little extra realism and immersion.

Hopefully I have broken things down into enough parts to give you all the chance to customise as you see fit, the engine can be removed
to reduce the overall poly count with just the full covers used and if you want other areas of the vehicle and crane can also be altered to the
bear minimum of meshes if you desire so you win all around I think.

We forget that the pilots of our war-birds required a whole army of support vehicles and trades to allow them to do the job they did so it is
nice to represent that in IL_2, our modded game most likely features many things we will never get in a more modern iteration of the series
so at least we have it here to represent those thousands of unknown men and women who keep/kept the air arms fighting.

Take care and be safe.

Wishing you all the very best, Pete. ;D
Logged

Mission_bug

  • Modder
  • member
  • Offline Offline
  • Posts: 5977
Re: Thorneycroft Amazon WF/AC6/1/Coles Mk VII, series 2.
« Reply #355 on: October 10, 2021, 02:43:03 PM »

Hello again guys, is it finished?  Sadly no not yet but getting there. :D


The moving vehicles for each respective climate are now done, all lods added. ;)


Summer:


Desert:


Winter:


All the parts with lods added show up in game, no screaming from the log, I have to assume all is okay so far. 8)


Next up are the statics, most of the parts for the moving vehicles will go into those to make up the majority of
meshes as they are, however, there are some slight changes.  Things like the fan comes in moving and stopped
variety, the crane cable in travelling and released ready to lift and then some engine covers in various positions
on the ground and so on have to be tackled yet.

The Coles crane in its own folders are deliberately centered to allow them to move around on a pivot and the crane
jib in lowered and raised position along with the chains are other additional parts still to have their lods made and
added but at least the bulk of this is now nearly done. :o

Take care and be safe.

Wishing you all the very best, Pete. ;D
Logged

rogeroger

  • Missioneer
  • member
  • Offline Offline
  • Posts: 470
Re: Thorneycroft Amazon WF/AC6/1/Coles Mk VII, series 2.
« Reply #356 on: October 10, 2021, 03:15:44 PM »

Brilliant Pete, I love that winter skin. ;D
Are the crew your work as well?
Logged

Mission_bug

  • Modder
  • member
  • Offline Offline
  • Posts: 5977
Re: Thorneycroft Amazon WF/AC6/1/Coles Mk VII, series 2.
« Reply #357 on: October 11, 2021, 01:56:00 AM »

Are the crew your work as well?

Hello Glen, glad you like it so far, the crew was borrowed from a existing mod here at S.A.S, I think they were added to
IL_2 by wingflyr not sure, I modified them slightly and retouched his textures to make a desert uniform. ;)

I really should give figure building a go, it will eventually come as the intention when I set out on this project was to
explore different things in 3d modelling including a look at Blender as well, however, right now the vehicles in this
set take priority.  :)

The winter wash is just that a smattering of White over the R.A.F colour, could not actually find anything to
show whether or not we had special winter colours for these, maybe not, however, for IL_2 purposes it got that
winter slot so to speak. :D


Take care and be safe.

Wishing you all the very best, Pete. ;D
Logged

rogeroger

  • Missioneer
  • member
  • Offline Offline
  • Posts: 470
Re: Thorneycroft Amazon WF/AC6/1/Coles Mk VII, series 2.
« Reply #358 on: October 11, 2021, 03:46:00 AM »

Hiya Pete :)

Quote
I really should give figure building a go, it will eventually come as the intention when I set out on this project was to
explore different things in 3d modelling including a look at Blender as well, however, right now the vehicles in this
set take priority. 

Character modeling, rigging and  animation is fun. After I learnt how to create models and rig them for animation back in 2004, this was my first project called"Bravefart". ;D
These are two clips of character creation,rigging and experimental animations that I made back in 2004 in 3dmax6.
For some reason I did not pursue this project further. I still have 3dmax6 but it only works on a 32 bit system.

I have not tried this sort of thing in blender yet.

https://youtu.be/BobrgCj3daw

https://youtu.be/DMz0ywwoHJ4


Logged

Mission_bug

  • Modder
  • member
  • Offline Offline
  • Posts: 5977
Re: Thorneycroft Amazon WF/AC6/1/Coles Mk VII, series 2.
« Reply #359 on: October 11, 2021, 04:27:18 AM »

I like the first one, Glen. 8)  I have many brain farts, maybe I could model that. :D

You would think 3dmax6 would still work, I have a 64 bit system but gmax is so old that is surely 32 bit and that still works for me, it does throw a few error messages on load up but I think that is more a problem with my possible misplaced/missed scripts and such rather than a sign of malfunction due to the 64 bit system, any techie Guru out there please for advice on this?

That said I have never yet tried anything with animations, for IL-2 I just orientate the part accordingly so either the java will move it or the user can move something like the Coles crane around in a circle.

Take care and be safe.

Wishing you all the very best, Pete. ;D
Logged
Pages: 1 ... 27 28 29 [30] 31 32   Go Up
 

Page created in 0.073 seconds with 25 queries.