Stock Japanese plane gun sight and glass mod, by WxTech


The following is the entire text contained in the included readme.txt file.
NOTE: THIS THREAD HAS EXACT (and easy to implement) INSTRUCTIONS ON ALTERING THE ZERO's RETICLE TO THE LATER IJN PATTERN FOUND IN THE GEORGE AND RAIDEN. (And it may be wise to check back occasionally in case other useful information appears.)
- - - - - readmeMOD.txt contents - - - - -
For stock planes present to 4.09. If additional Japanese planes have been added as stock, they will not be altered if their cockpit reads files from a newly made folder. But if a plane variant has been added which *does* read from the same folder as used by earlier-made variants to 4.09, it too will (or should) be modified.
NOTE: The damaged models of the gun sights have not yet been addressed; ONLY the undamaged versions have been worked on. As it is, *many* tens of hours of work has been expended on this pack.
________________________________________
Given that the gun sight is such a prominent and important piece of equipment, it being in the line of sight for a goodly fraction of one's time, it is deserving of improvement in fundamental appearance and behavior optically.
The cockpit glazing and armored screens feature very prominently as well, of course, as we almost always are looking out at the world through these surfaces. I feel that a too-clean appearance here is unrealistic. Some degree of contrast degradation can be tolerated and not impact game play. Moreover, and with 6DoF in particular, the schmutz on the glazing really helps to reinforce the sense and sensation of virtual head motion and location in the cockpit.
My emphasis here is on the *optical* aspects which affect canopy glazing and gun sight reflector plates, sun shades and collimating lenses. And of course the reticle, too, it being optically created.
Regarding reticles. There has been something of an evolution of their appearance over the years. The originals were boringly flat and dully uniform in color; rather lifeless and un life-like. Then modders started swinging the needle too far to the other extreme, with exaggerated blurring and glows, making the optics seem to be of 'Coke bottle bottom' quality. At any rate, there is much variety out there.
I've kind of swung back to a middle ground on reticle appearance. I like a 'cleaner' look which does not obscure the target, and so I eschew the prominent blurred halo kind of effect. There are three reasons for this:
1] The game cannot correctly represent contrast variation here. The brighter the background the brighter the reticle because of the additive blending. This is wrong! In reality, a brighter background will result in the reticle appearing to get relatively dimmer and harder to see because contrast is reduced. And in reality if one did not reduce reticle brightness, against a dark background it will be annoyingly bright. But in the game we see the reticle darkening in step as scene brightness decreases. The game effectively--and inadvertently--applies a dynamic reticle brightness adjustment based on background scene brightness.
2] Even crude gun sight collimators will produce a reasonably sharp image of the reticle, at least out to several degrees, or about 50 mils, off axis. The primary aberration will be ghost reflections from the uncoated lens surfaces. But such ghost images of the reticle can at worst have a brightness of about 4% that of the direct image, usually much less.
3] The dynamic range of a monitor is vastly less than that of our eyes. Compression of the brightness range only imposes an unrealistic handicap if we interpose additional contrast reducers at the fairly small scale of the reticle pattern spatial frequency. In other words, the combination of limited dynamic range and limited resolution due to finite pixel size work against us.
________________________________________
Changes made:
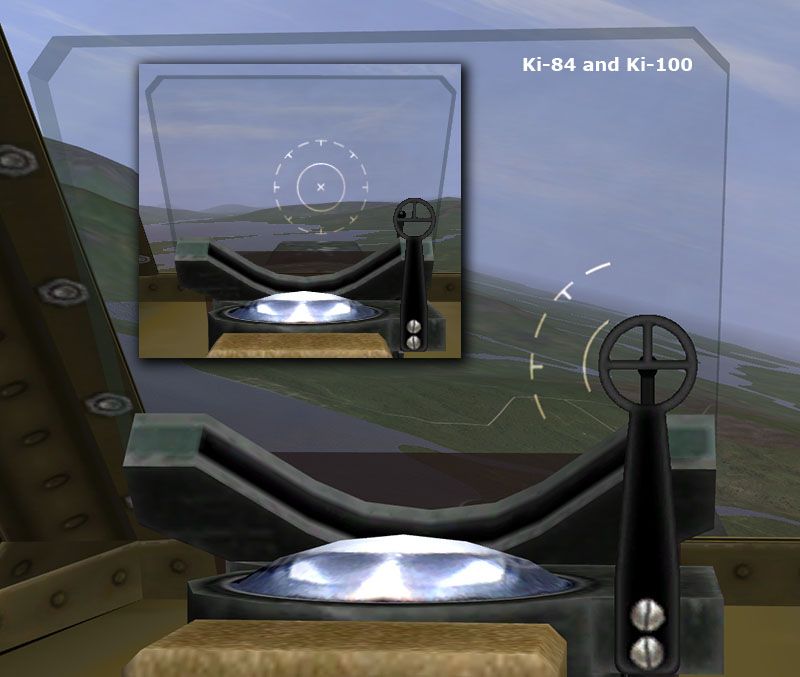
- The truly excreble gun sight reflector plates on the Ki-84 and Ki-100 have been fixed. The corner bevels have been altered in size and angle.
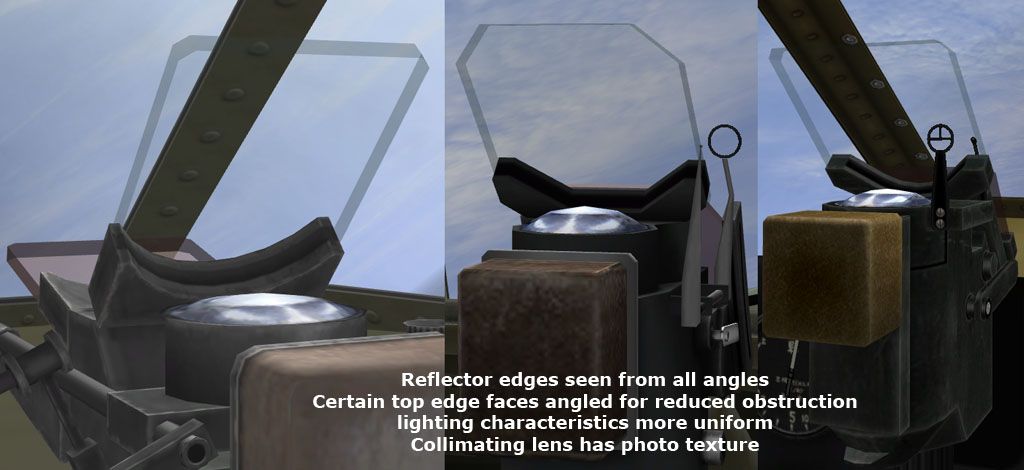
- Gun sight reflector plates, and some sun shades, have had additional edge polygons added where necessary so that these edges are now seen from all angles. (No disappearing edges with 6DOF.)
- Numerous errors in vertex matrices resulted in odd lighting artifacts, and were fixed where discovered.
- Gun sight reflector plates have been given a slight opacity component and a subtle greenish tint, as well as semi-transparent edges.
- A photographic collimating lens texture has beeen added to all sights.
- Reflector plate top edge surfaces have been angled so as to present the minimal projected width for:
Ki-43-II
Ki-43-II(Kai)
Ki-84
Ki-100
N1K2 (and N1K1)
-The Ki-61 reflector plate formerly used the same texture for both the see-through and edge faces. These surfaces now have their own textures.
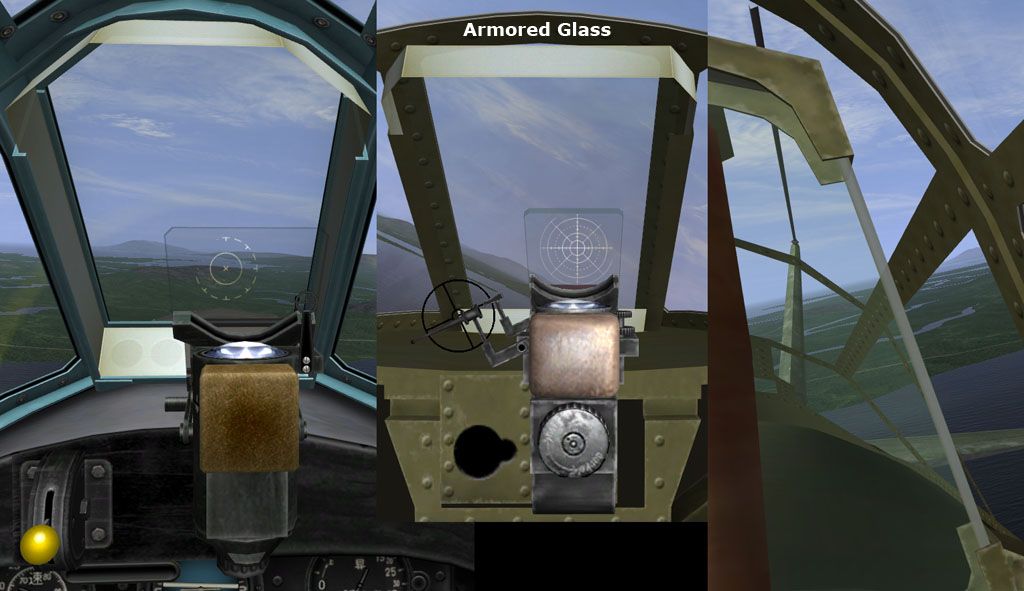
- The former situation of gun sight reflector and armored glass sharing the same texture has been redressed; these are now decoupled, thus permitting full control of their individual appearance. Now the armored glass exhibits a very different edge from that of the gun sight reflector, and somewhat greater opacity and light scatter across the see-through surface.
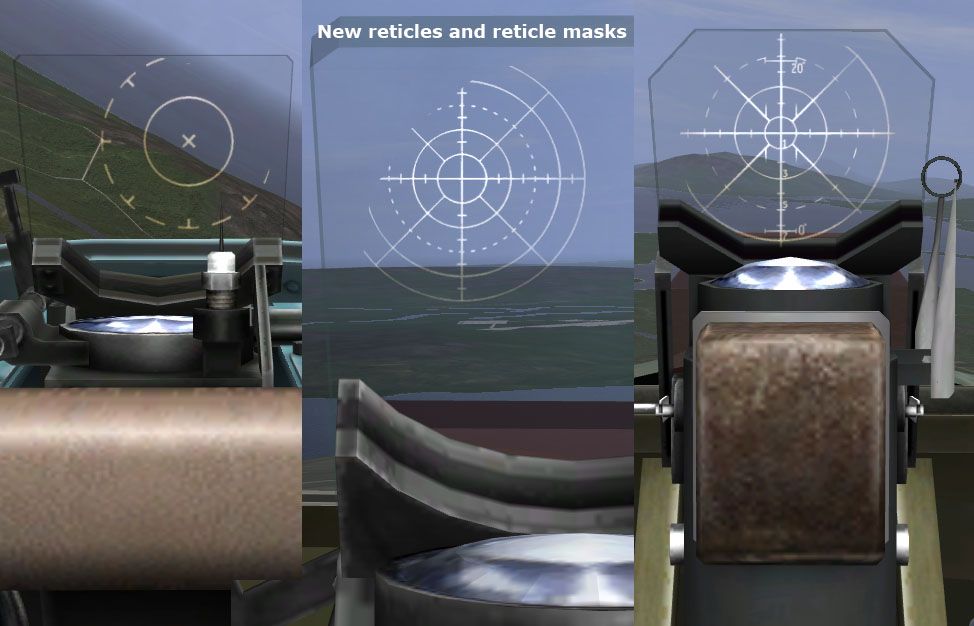
- New reticles are provided which are less intrusive in target obscuration.
- Reticle masks have been altered so that all present a circular aperture more in keeping with real characteristics, whereby reticle visibility is constrained by the circular edge of the reflected image of the collimating lens. But as a concession to game play, the mask apertures have been made larger than the collimating lens so as to be not too constrictive. But this is not too unrealistic in one respect. With head motion, parallax effects would result in some shifting of the reflected image of the collimator, effectively expanding the total area on the reflector through which the reticle will be seen at least in part at any one time.
- The Type 3 reticle has been made more correct in appearance, whereby the dashed outer ring now has larger gaps than the stock reticle was given.
- The Type 3 gun sight iron sights on the Ki-84 and Ki-100 have been improved in both appearance and alignment, based on a photo of such a sight. The former inner ring has been replaced with an inverted 'T'. The post containing the bead has been slightly reduced in height. Better target visibility and easier/correct alignment result.
- All sun shades are given a dark reddish-brown tint, the opacity being pretty effective right up to very near the Sun.
- The N1K2-Ja armored screen has been toned down in its dimming/scattering properties, this formerly having been rather exagerrated in my opinion.
- Cockpit Perspex has had its 'dirt/light scatter' texture boosted somewhat in prominence for planes formerly having a too-clear appearance. And the texture for the A6M and some other planes has been altered to a common standard (the stock ones being ugly to my eyes.) These textures have a neutral color, not the yellow-green hue formerly seen in some cases.
- The Ki-100 instrument panel has had the gap at top center (behind the gun sight) filled in so that with 6DOF one cannot see through the firewall/engine, out to the world beyond.
- Telescopic sights (Ki-27, Ki-43-I and D3A1), as seen in the normal cockpit view, have the awful, fat painted-on-the-eyepiece reticle removed. And the partial transparency on the lens surface is restored for the Ki-27.
- The through-the-sight view of the telescopic sights (Ki-27, Ki-43-I and D3A1) has had the mask edge better aligned and improved in appearance.
- Some crash pad textures have been altered.
- Most shared .tga's are reduced to just the one, residing in one plane's folder and being accessed therefrom by other planes.
________________________________________
Numerous fixes involved the very simple expedient of merely changing in the .mat file one or both of:
- AlphaTestVal 0.5
Usually too high at 0.5, cutting off partial transparencies of opacity < 0.5 to complete transparency (invisibility.) Changing to 0.0 or 0.1 does the trick.
- tfBlend 0
If a texture has parts which are partially transparent, this parameter *MUST* be set to 1. Otherwise what should be a partial transparency is made fully opaque.
The game is riddled throughout with just such little oversights.
________________________________________
Don't like the 'dirty' Perspex? In the Glass.mat or GlassCanopy.mat file, lower the opacity. This is the last value in the line,
ColorScale 1.0 1.0 1.0 0.5
The four numbers are, respectively, red, green and blue intensity (0 to 1), and the opacity, or alpha channel intensity (0 to 1). Changing opacity from 0.5 to 0.2 or 0.3 will significantly tone down the visibility. Making zero will, of course, make the glazing perfectly transparent. Making 1.0 will be rather on the dark side (but not black, for the .tga already has its own alpha channel, which makes it partially transparent to start with.)
If you would like a greenish tint with a hint of blue, you could try RGB values of 0.7 1.0 0.8.
If you would like a greenish tint with a hint of yellow, RGB could be 0.8 1.0 0.7.
________________________________________
In similar vein, altering the GunsightGlass.mat, Revi16BG.mat, etc., file ColorScale parameters afford easy adjustment of the gun sight reflector plate opacity. However, because the .tga files have the alpha channel adjusted to the final opacity, with the .mat file having opacity as 1.0, one can only lower opacity by this means. To increase opacity, use a graphics editor to make the alpha channel patch in the relevant portion in the .tga a lighter tone. White is fully opaque, and black is fully transparent. Note that the graphics software must be able to handle alpha channels and save files with the alpha channel not removed. Irfanview (or my copy, at least) does not seem to be able to save an image without losing its alpha channel.
In some gun sight reflector .tga's the different colored patches are arranged so that:
- Upper left is for the reflector face.
- Lower left is for the reflector edge.
- Upper right is for the sun shade face.
- Lower right is for the sun shade edge.
In other .tga's the patches are arranged as follows:
- Top is the reflector face.
- Second from top is the reflector edge.
- Third from top is for the sun shade face.
- Bottom is for the sun shade edge.
Via the .mat file ColorScale values you can alter the color of the reflector and sun shade surfaces to some degree. Large alterations might be better performed by altering the .tga's themselves.
________________________________________
And in yet another similar vein, the reticles can be adjusted in color and intensity, a sufficiently large range being effected via the Reticle.mat file's ColorScale values. No need for graphics software here.
________________________________________
As noted above, many shared .tga's are reduced to just one, residing in one plane's folder (the A6M2, in particular.) If you would like to customize such a graphic for a particular plane, do this.
- Copy the .tga in its current 'home' and place it in your plane's folder.
- Alter the path to the graphic in the .mat file for your plane. For example, in the [A6M5c] folder's Reticle.mat file is the line,
TextureName ../A6M2/Reticle2.tga
The A6M5c reads its Reticle2.tga from the [A6M2] folder. Make a copy of the .tga and place it in the [A6M5c] folder.
In the .mat file, simply remove the "../A6M2/" part so that only "Reticle2.tga" remains. Now the game will read the Reticle2.tga you've placed in the [A6M5c] folder. You could apply to the reticle2.tga whatever localized alterations you'd like, such as line gaps due to dirt, or brightness hot/dark zones, etc., to make it different from its siblings in other planes.
NOTE: After making changes which result in a file being added to a plane's folder, you must quit and restart the game for the change to be registered. At game startup, the entire MOD directory is searched and 'mapped' for components, this directory structure 'map' remaining in effect during the entire run time.
________________________________________
I hereby give permission for the free use of this work, in part or in whole, in any other work by anyone, without condition or restriction.
WxTech
Jan. 23, 2015
Get it here:
https://www.mediafire.com/?v9o4x74x2s9u6ax Author
Topic: Stock JA Gun Sights and Glass Mod, by WxTech (Read 19851 times)


