Special Aircraft Service

Please login or register.

Login with username, password and session length
Advanced search  
Pages: [1] 2   Go Down

Author Topic: Tutorial - Manual Channel Map Edit  (Read 18076 times)

0 Members and 1 Guest are viewing this topic.

KiwiBiggles

  • Modder
  • member
  • Offline Offline
  • Posts: 525
Tutorial - Manual Channel Map Edit
« on: February 01, 2014, 03:04:25 PM »

Tutorial - Manual Channel Map Edit


Hi all,

Boomer created a brilliant map editing kit and tutorial that has been inspirational to me, and many other IL-2 fans too.  Because Boomer's kit was created as a UP3 JSGME mod, it can be a bit confusing for players with manual installs or other versions of the game.  I have a current project to customise a map for one of my favourite installs (a 4.11 SAS Modact build) so it might be worthwhile to post up my project with the aim of encouraging even more IL-2 fans to have a go at map editing.

We're going to use an alternative 'manual' map editing method that I like to use.  It may suit you too.  At the least, I hope you find this an interesting article.  :)

To complete the tutorial you will need to be a moderately advanced mod user, at least reasonably comfortable with manually installing mods.

Remember to always back up your files as you work!

Come back often... here we go!  :)
Logged

KiwiBiggles

  • Modder
  • member
  • Offline Offline
  • Posts: 525
Re: Tutorial - Manual Channel Map Edit
« Reply #1 on: February 01, 2014, 03:05:03 PM »

My motivation for this project is CrazyFlak's awesome Typhoon mod.  The skinning community has recently released some outstanding new skins for this baby, and the Typhoon has been my favourite WWII fighter since I was a kid.  Naturally, I'd love to fly with the Article XV New Zealand Typhoon Squadron, No. 486 (RNZAF).  Among many other daring feats, the Kiwi's of 486 Squadron were based at Tangmere from October 1942 on patrols against the Jabos of JG2 and JG26.  I'd like to recreate these adventures in a short scripted campaign for Flak's Typhoons.


The perfect map for my campaign will be an upgraded version of CannonUK's Beta Channel Map.  It's fast (both in terms of frame rates and missions, due to it's approx 1/2 'dogfight' scale) and covers the English Channel from London to Southhampton and Ostende to Cherbourg, including Tangmere of course.  First up,we need to install the basic map (unless your install is a modpack like UP3, DBW or HSFX in which case just check to see the map is already installed).  This great little map isn't generally available for manual installs anymore, so we need to access a version extracted from HSFX, you can download it here:

https://www.mediafire.com/download/5c485749zdbmcjk/CAN_Channel.7z

To install the map successfully you need a custom object pack (again, this step doesn't apply to UP3, DBW or HSFX).  I like to use an early version of Boomer's object pack.  This version has 'classic' mod file structure, which is nice if you like to get stuck into your object files and mod 'em or otherwise muck around.  There are also later versions of Boomer's object pack that are compressed into 'SFS' files (the game's native format) - they load faster when you first start the game, but to access the files for modding you have to extract them first.  Feel perfectly free to download and use the SFS version here if you prefer.  :) 

The really nice thing about Boomer's object pack is that it enables your install for probably 99% of all the maps out there in the modding community.  If your install does not include all the correct objects, your downloaded map will load in the FMB - but it won't save missions.  The static.ini checker is used to check for missing objects.

Here's the object pack I use:

https://www.mediafire.com/download/z2up6a4hcvbv86r/00_Objects.7z

https://www.mediafire.com/download/b1en1n85ql76qj1/00_Objects_I.7z

https://www.mediafire.com/download/hbec1bv1wp7b4c1/00_Objects_II.7z

https://www.mediafire.com/download/65c39yjdsx3f3ul/00_Objects_III.7z

https://www.mediafire.com/download/datziu3aqqahxb1/00_Objects_STD.7z


Be aware that the object pack includes a 'static.ini' file - in folder 00_Objects_STD - which tells the game how to access objects (not just the ones in the pack, but all the objects in the game).  Technically, the static.ini should be matched to your install (i.e 4.09/4.10/4.11/4.12 etc) however this gets tricky when there are so many different objects and game versions out there.  The static.ini in this version is matched to 4.09 as far as I know - a project for another day is to release static.ini's for the later versions too.  In the meantime, don't let this put you off - all it means is that objects released for 4.10/11/12 will not appear in your game while the object pack is activated.  It won't stop your game running, and it won't prevent us completing this project.  If you need the later objects for another project, just deactivate the object pack in the meanwhile.

You can also add extra objects you download from here at SAS or elsewhere, just make sure to add them to the static.ini in the object pack, not the 'standard' static.ini (or alternatively add objects to both static.ini's if you're going to switch between them).

You also need any custom textures used by the map (already included in UP3, HSFX and DBW).  For manual installs, this texture pack includes all the textures for CAN_Channel (and many others besides):

https://www.mediafire.com/download/n3th7bao3t6jdd7/land.7z

1. Start your map install by simply extracting the five object pack .7z folders into your mods folder (#SAS in my case).

2. Next extract CAN_Channel.7z into your map mods folder (mine is MAPMODS/MAPS).

3. Then extract the texture pack land.7z here: MAPMODS/MAPS/_Tex

4. Finally, add this line to your all.ini file in MAPMODS/MAPS:    EnglishChannel(Can) CAN_Channel/CAN_40_load.ini


Start your game and open your new EnglishChannel(Can) map in the FMB - if everything has worked properly the map will open right up:


I'm going to whip up a very basic test mission, that will eventually grow into my Tiffie mission template and campaign.  I've created a folder to save it in here:

IL-2 Sturmovik 1946/Missions/Single/GB/Typhoon_MkIb

For more information about creating missions, there's plenty of great info here and here to get you started.


If your map has been successfully installed along with all the necesary objects, your mission will play and save.  If the map loads in FMB, but will not save or play missions, you have missing objects and will need to use the static.ini checker to identify the missing objects, and then you'll need to search them out online.  Usually a google search will find the missing objects in a few minutes, or use the search function here at SAS, or if you're really stuck - post in the lounge to see if anyone can assist you.

Well done, thats the first job accomplished!  You either already have a modpack including the EnglishChannel(Can) map, or following the steps above you've succsessfully installed a working copy in your manual install.  Next job is to start pimping out our map!  :)


Logged

KiwiBiggles

  • Modder
  • member
  • Offline Offline
  • Posts: 525
Re: Tutorial - Manual Channel Map Edit
« Reply #2 on: February 01, 2014, 03:05:20 PM »

We're gonna cheat here a bit, because a brilliant upgrade for this map has already been created by well-known IL-2 artist vpMedia. Grab both downloads here:

https://www.sas1946.com/main/index.php/topic,24522.0.html

You need to download two files:

vp_Channel40_beta_map_update_v1.zip

vp_mapmods_buildings_dbw_2012.rar


Now, Istvan's upgrade was designed for DBW - but because we have manually loaded Boomer's object kit, and Cannon's original beta map, we can enjoy the upgrade too!  :)

Unzip both files into your MODS folder (remember in my install its #SAS) - you will end up with 3 files.  I like to rename mine as follows, to make sure they load in the order I want when I start my game:

0 VP Channel40_beta_map_update_v1

0 VP MAPMODS_v4_DBW

0 VP TEXTURES_Buildings_v3_DBW


Go ahead and load your test mission in the FMB to make sure your install matches vpMedia's:


If you can resist the temptation to fly a Tiffie through the Tower Bridge you're a better man than me!   ;D


This upgrade package improves a great many maps and objects in your game in addition to Cannon's Beta Channel map.  Read more here:

http://www.vpmedia.eu/il2/


Ok, RAF Tagmere is already a much more impressive looking place.  But we want to stamp our own personality on this brilliant little map.  On to the next stage - our own custom map editing!

Logged

KiwiBiggles

  • Modder
  • member
  • Offline Offline
  • Posts: 525
Re: Tutorial - Manual Channel Map Edit
« Reply #3 on: February 01, 2014, 03:05:50 PM »

To access the FMB for map editing is pretty straightforward. 

First we need a modified bldconf.ini - found in the main game directory (i.e. IL-2 Sturmovik 1946/bldconf.ini).

Backup the original bldconf.ini - I simply rename mine with a hyphen (-) like so: -bldconf.ini

This file is now your mission building bldconf.ini

Here is the code to create your map building bldconf.ini:

Code: [Select]
[builder_plugins]
  (builder.PlMapLoad)
  (builder.PlMapActors,sectFile=com/maddox/il2/objects/static.ini)
  (builder.PlMapAirdrome)
  (builder.PlMapLabel)
  (builder.PlMapText)
[builder config]
  bShowGrid true
  bShowName true
  bViewRunaway true
  bShowTime true
  bShowArmy [3,true,true,true]
  iLightLand 255
  iconSize 16
  bViewBridge true
  bAnimateCamera true
  bActorOnLand true
  bSaveViewHLand false
  bShowLandscape true
  iLightDestruction 128
  iWaterLevel 191
  defFullDY 24.0
  defFullDX 32.0

Just copy the code into Windows Notepad, and save the file as 'bldconf.ini' then drop it into your main game directory.

Next we add some extra commands to our conf.ini in the [HotKey builder] section:

Ctrl C=copy
Ctrl X=cut
Ctrl V=paste


These commands access special functions in the map building FMB.

The last job is to provide a folder to 'save' our map edits.  Create a new folder in your main game directory:

IL-2 Sturmovik 1946/Maps/

Inside the new Maps folder create an empty 'edit saving' sub-folder for our Channel Map, like so:

IL-2 Sturmovik 1946/Maps/CAN_Channel

That's it!  Simple huh.  :)

Here's a couple tips:  How do we know what to call our new map saving folder?  Remember we have added vpMedia's upgrade to our install, and renamed the folder, so the actual map installed when the game starts, is now found here: 

IL-2 Sturmovik 1946/#SAS/0 VP Channel40_beta_map_update_v1/maps/CAN_Channel

'CAN_Channel' is the name of the Maps folder.

You can also find the name for any map (even if it isn't extracted into your mods folder like our channel map e.g. an original stock map) in the .mis file, by creating a test mission in the map you want to edit - you'll want a test mission for your map edits in any case.  Here's the .mis file for my Channel test mission, the map folder name is in red:

IL-2 Sturmovik 1946/Missions/Single/GB/Typhoon_MkIb/Typhoon_MkIb_001.mis

[MAIN]
  MAP CAN_Channel/CAN_40_load.ini
  TIME 12.0
  CloudType 0
  CloudHeight 1000.0
  player RAF_No486SQN00
  army 1
  playerNum 0
[SEASON]
  Year 1940
  Month 6
  Day 15
[WEATHER]
  WindDirection 0.0
  WindSpeed 0.0
  Gust 0
  Turbulence 0
[MDS]
  MDS_Radar_SetRadarToAdvanceMode 0
  MDS_Radar_RefreshInterval 0
  MDS_Radar_DisableVectoring 0
  MDS_Radar_EnableTowerCommunications 1
  MDS_Radar_ShipsAsRadar 0
  MDS_Radar_ShipRadar_MaxRange 100
  MDS_Radar_ShipRadar_MinHeight 100
  MDS_Radar_ShipRadar_MaxHeight 5000
  MDS_Radar_ShipSmallRadar_MaxRange 25
  MDS_Radar_ShipSmallRadar_MinHeight 0
  MDS_Radar_ShipSmallRadar_MaxHeight 2000
  MDS_Radar_ScoutsAsRadar 0
  MDS_Radar_ScoutRadar_MaxRange 2
  MDS_Radar_ScoutRadar_DeltaHeight 1500
  MDS_Radar_HideUnpopulatedAirstripsFromMinimap 0
  MDS_Radar_ScoutGroundObjects_Alpha 5
  MDS_Radar_ScoutCompleteRecon 0
  MDS_Misc_DisableAIRadioChatter 0
  MDS_Misc_DespawnAIPlanesAfterLanding 1
  MDS_Misc_HidePlayersCountOnHomeBase 0
  MDS_Misc_BombsCat1_CratersVisibilityMultiplier 1.0
  MDS_Misc_BombsCat2_CratersVisibilityMultiplier 1.0
  MDS_Misc_BombsCat3_CratersVisibilityMultiplier 1.0
[RespawnTime]
  Bigship 1800
  Ship 1800
  Aeroanchored 1800
  Artillery 1800
  Searchlight 1800
[Wing]
  RAF_No486SQN00
[RAF_No486SQN00]
  Planes 1
  Skill 1
  Class air.TYPHOON1B
  Fuel 100
  weapons default
[RAF_No486SQN00_Way]
  NORMFLY 47000.30 101696.90 500.00 300.00 &0
  NORMFLY 42606.43 103669.35 500.00 300.00 &0
[Chiefs]
  0_Chief Vehicles.ZIS5_PC 1
[0_Chief_Road]
  43746.65 103277.91 120.00 0 2 3.055555582046509
  44760.71 103725.65 120.00
[NStationary]
[Buildings]
[Bridge]
[House]

The folder name is also in the all.ini file as you'll recall when we installed the original Channel map.

To get back to normal mission building mode I just rename my map building bldconf.ini like so, with two hyphens: --bldconf.ini

and rename my mission building bldconf.ini like so: bldconf.ini

The game engine loads whichever is named bldconf.ini (without hypens) and I simply swap between the two with a quick file rename.  It's a pretty simple system in practice:

-bldconf.ini is for mission building

--bldconf.ini is for map building

Rename the one you want to use to bldconf.ini - easy!

If you prefer another system of swapping the bldconf.ini, that makes more sense to you - feel free.  The point is just to use the bldconf.ini for whatever job is at hand - mission or map building.

If you ever have a problem, here's the code to create the original, stock, mission building bldconf.ini:

Code: [Select]
[builder_plugins]
  (builder.PlMapLoad)
  (builder.PlMission)
  (builder.PlMisAir,sectFile=com/maddox/il2/objects/air.ini)
  (builder.PlMisChief,sectFile=com/maddox/il2/objects/chief.ini)
  (builder.PlMisStatic,sectFile=com/maddox/il2/objects/stationary.ini)
  (builder.PlMisRocket,sectFile=com/maddox/il2/objects/rockets.ini)
  (builder.PlMisHouse,sectFile=com/maddox/il2/objects/static.ini)
  (builder.PlMisTarget)
  (builder.PlMisBrief)
  (builder.PlMisBorn)
  (builder.PlMisStaticCamera)
  (builder.PlMisDestruction)
  (builder.PlMisFront)
[builder config]
  bShowGrid true
  bShowName false
  bViewRunaway true
  bShowTime false
  bShowArmy [3,true,true,true]
  iLightLand 255
  iconSize 16
  bViewBridge true
  bAnimateCamera true
  bActorOnLand true
  bSaveViewHLand true
  bShowLandscape true
  iLightDestruction 128
  iWaterLevel 191
  defFullDX 32.0
  defFullDY 24.0

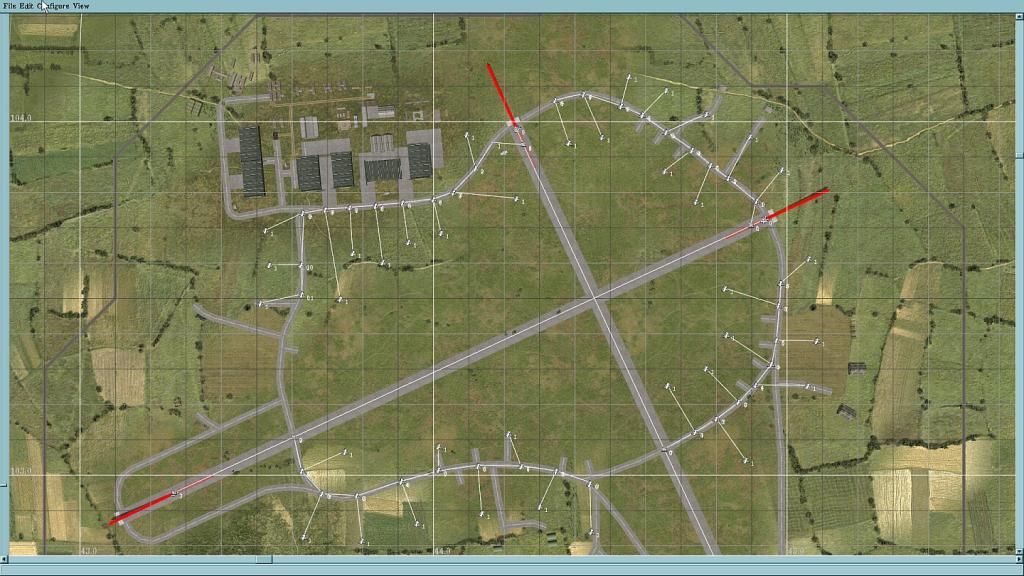
Righto!  Go ahead and activate your map building bldconf.ini, start the game and open our Channel map in the FMB.  Remember it's called EnglishChannel(Can) in game (from the all.ini file).  It's normal for the map builder to take a little while to load, so give it a minute.  If you've done everything right, RAF Tangmere will look like this:


It's 6:30 am here, way too early for a Bourbon and Coke, so I'm gonna make a Latte to celebrate.  Back soon!  :)
Logged

KiwiBiggles

  • Modder
  • member
  • Offline Offline
  • Posts: 525
Re: Tutorial - Manual Channel Map Edit
« Reply #4 on: February 01, 2014, 03:06:08 PM »

Good Job!  I hope that was interesting and successful for you :)

If your game can't install the map builder, you may need more memory: select more RAM in your IL-2 Selector, or for classic and legacy installs (i.e. 4.09) you can find the original 'big' exes (up to 1G memory) here:

https://www.mediafire.com/download/bbtbpcxjiri0t92/EXES.7z

Let's back up a bit.  Boomer's tutorial does a wonderful job of explaining how to use the map builder, and it is well worth the time to compete the tutorial at this stage.  Here are the files you need to install Boomer's Guadal_Testmap manually:

https://www.mediafire.com/download/d4e1cdd6op0di60/Guadal_Testmap.7z

Go ahead and unzip the file in your mods folder, mine is here: IL-2 Sturmovik 1946/#SAS/MAPMODS/MAPS/Guadal_Testmap/

You should have noticed this is where we installed the original CAN_Channel map, and is a different method to vpMedia's upgrade, which is installed in a separate folder (which we renamed to '0 VP Channel40_beta_map_update_v1').  Both methods are valid, and it's worthwhile to see an example of each.

Here is the line for your all.ini file:

Guadal_Testmap Guadal_Testmap/load.ini

And don't forget to add an empty 'edit saving' folder here:

IL-2 Sturmovik 1946/Maps/Guadal_Testmap

Go ahead and load up Guadal_Testmap in your map building FMB and have a crack at Boomer's tutorial here.  Remember, you don't need to install Boomer's JSGME kit because we've already installed a manual version. You can start Boomer's tutorial in the first post here:

"Ok,load up the _Guadal_Testmap_," 

All good? Don't forget, your edits will be saved in IL-2 Sturmovik 1946/Maps/Guadal_Testmap:)

Logged

KiwiBiggles

  • Modder
  • member
  • Offline Offline
  • Posts: 525
Re: Tutorial - Manual Channel Map Edit
« Reply #5 on: February 01, 2014, 03:06:26 PM »

How did the tutorial go?  Great isn't it!  There is some handy info on page two - how to use bridges in the map builder.

Also make sure to check out Spdr109's airfield tutorial.

We're armed with everything you need to start editing our Channel Map.   :)

We can get inspiration form period photograpy and art, such as this beautiful painting of a Sussex village by Nicolas Trudgidan:


Or even other maps we admire in IL-2 and other sims:


Although seventy years have passed we can still see clues in Google Maps:


... or just our own imagination.  A map builder can't detail every square inch of a map - the task would be impossible, and in any case the resulting map would bring the game engine to its knees.  But when we customise a map for ourselves, we can give extra attention to just the areas we're most interested in - for example RAF Tangmere for my Typhoon campaign:

Logged

KiwiBiggles

  • Modder
  • member
  • Offline Offline
  • Posts: 525
Re: RAF Tangmere 1942-1943 progress pics
« Reply #6 on: February 01, 2014, 03:06:44 PM »


Logged

KiwiBiggles

  • Modder
  • member
  • Offline Offline
  • Posts: 525
Re: Tutorial - Manual Channel Map Edit
« Reply #7 on: February 01, 2014, 03:07:04 PM »


You can download my completed RAF Tangmere upgrade here.

Cheers
KB
Logged

sowercrowd

  • member
  • Offline Offline
  • Posts: 24
Re: Tutorial - Manual Channel Map Edit
« Reply #8 on: April 20, 2014, 03:34:22 PM »

Thank you so much for this tutorial and posting links !!  I spent Days trying to find that Canonuk Channel Map and Boomers Object Pack for my "indie" mod inst., since I couldn't
get Access to M4T( didn't even get a reply) Now i can finally resume "Eaglesday"Campaign on my old 3,2 GHz Prescott ! :D (and very helpful in Terms of General understanding mods folder structures etc.)Thanks again!
Logged

Uzin

  • Modder
  • member
  • Offline Offline
  • Posts: 2790
  • On lifetime holidays
Re: Tutorial - Manual Channel Map Edit
« Reply #9 on: April 20, 2014, 03:54:01 PM »

Hi, KiwiBiggles,
your tutorial is outstanding work !
Looking forward to continuation.
Logged

solotk

  • member
  • Offline Offline
  • Posts: 178
Re: Tutorial - Manual Channel Map Edit
« Reply #10 on: April 20, 2014, 05:21:32 PM »

Sowercrowd,

I'm in the same position as you, Can't get registered on Mission4Today, no reply to the 3 emails I sent them. Therefore, I can't download the VPmedia extras , as that is the only site they're listed on.

Is there any chance of some mediafire links for ;

0 VP Channel40_beta_map_update_v1

0 VP MAPMODS_v4_DBW

0 VP TEXTURES_Buildings_v3_DBW


However, as I'm currently on HSFX7.02, are they already included, as well as all updates foe the Channel Map series?
Logged

KiwiBiggles

  • Modder
  • member
  • Offline Offline
  • Posts: 525
Re: Tutorial - Manual Channel Map Edit
« Reply #11 on: April 20, 2014, 06:56:13 PM »

Hi Solotk,

I'm pretty sure Canon's original map is already in your version of HSFX  - in HSFX 6 the map is called 'Channel 1940 beta (Can)'.

In regards to the upgrade, just compare your HSFX version to the images above from vpMedia.  Have a look at the Tower Bridge in London, and any of the radar sites.  If they look like the pics above, you already have the upgrades. HSFX 6 has them already.

All the best
KB
Logged
Pages: [1] 2   Go Up
 

Page created in 0.072 seconds with 29 queries.